Config Manager: Operating System Deployment
Operating system deployment (OSD) in Config Manager is the process by which the files of a particular build of Windows are copied to a computer’s primary storage device. Departmental IT staff can use Config Manager to install, reinstall or upgrade to builds of Windows that are supported by Microsoft.
In our environment here at NC State University, OSD is done over the network via PXE booting, downloading a boot image, and running one of the available OSD task sequences. You can think of a task sequence as a script that executes a sequence of steps from top to bottom. Logic can be added to steps to allow the installer to make decisions on whether or not certain sections or steps should be executed.
The aspects of the OSD process that we will be detailing here are:
- Drivers
- Driver Packages
- Operating System Images
- Operating System Upgrade Packages
- Boot Images
- Task Sequences
Drivers
Windows Middleware Services (WMS) maintains drivers for CPI-approved computers and Windows builds that are still actively supported by Microsoft. Due to the time and effort that goes into driver management, we are generally unable to support drivers for non-CPI computers. Even with the CPI list, we still have a diverse range of machines which would make maintaining a task sequence with all of the appropriate driver packages time consuming. If you have a driver that is needed, however, please let us know we will take a look.
We use MSEndpointMgr’s Driver Automation Tool (DAT) (GitHub) to automate the driver management process, namely, downloading, staging, and creating the Config Manager application package. The Driver Automation Tool supports some Dell, Lenovo, HP, and Microsoft desktop, workstation, and laptop computers, typically in their business line of products.
See Driver Package Management for more info.
Driver Packages
A driver package is a group of drivers for a specific make and model computer. In Config Manager, DAT, creates a standard application package when a driver is imported. The package is the thing that contains all the driver files that are downloaded by the client during OSD.
In more standardized corporate environments, having a driver package for each hardware configuration would be easy since they tend to purchase large quantities of the same model computer, with the same configuration.
How can I find out which model computers have drivers available?
DAT downloads a driver catalog XML file from the manufacturer and parses it to determine which models have drivers available. Click on one of the links below to download the file. The .cab files are zip files that can be opened in Windows Explorer.
- Dell – DriverPackCatalog.CAB
- Lenovo – catalogv2.xml
- HP – HPClientDriverPackCatalog.cab
- Microsoft – MSProducts.xml
While the XML files are not the most pleasant to read, if you would like to if your model computer can have its drivers added to Config Manager using DAT, search for the model and if it’s there, we can do it.
Looks like you can also see what is available on Dell’s support website.
How can I find out which drivers are available in Config Manager?
Launch Configuration Manager Console and click on Software Library -> Application Management -> Packages -> Driver Packages. There you will see folders for each manufacturer that has drivers available in Config Manager.
OSD Packages
The packages in Config Manager that are used for OSD contain the files needed to do something during certain steps in the task sequence. That could be running a script or using an unattend file to customize the operating system installation, for example.
We have two packages that are maintained for OSD, NCSU-OSD Production and NCSU-OSD Preproduction. The content for each being respectively stored at:
\\wolftech.ad.ncsu.edu\files\packages\ConfigManager\OSD
and
\\wolftech.ad.ncsu.edu\files\sccm\NCSU\ConfigManager\OSDPreproduction
The content currently being used in the NCSU-OSD Production package are:
- Invoke-CMApplyDriverPackage.ps1 – Queries Config Manager for a driver package that matches the computer’s SystemSKU.
- sccm_get_computer_name.ps1 – Queries on-prem AD for a computer object whose netBootGuid attribute matches the computer’s MAC address.
- TSVarsSafeDump.ps1 – Writes all the task sequence variables and their value to a file.
- NCSU-Unattend.xml – Configures some settings for the post-installation Windows Out of Box Experience (OOBE).
Operating System Images
Operating system images contain all the files necessary to install a full version of an operating system on a computer. For Windows, the files are stored in a Windows image (wim) file and the wim files we import are located at:
\\wolftech.ad.ncsu.edu\deployment\Staging\Images\
Which operating systems are available?
Every effort will be made to provide all currently supported Microsoft operating systems for deployment. Including Windows 10, Windows 11, Windows LTSC, and Windows Server Datacenter and Core.
Can my department use a our own custom image?
Yes! Custom images or reference images are images customized with applications, settings, etc., captured and deployed.
Departments can create their own image by capturing an install of a Microsoft supported build of Windows and after using Sysprep to generalize the installation. That image can then be imported into Config Manager and a task sequence configured to use it.
A custom image can be copied to the deployment share at:
\\wolftech.ad.ncsu.edu\deployment\Staging\Images\OperatingSystemImages\<DEPT>\
then send an email with the path to the image to activedirectory_imaging@help.ncsu.edu and we will import it into Config Manager.
Please note that if you are creating and capturing an install for the purpose of having applications installed and ready to go once the task sequence is complete, consider using the Install Application step in a task sequence instead.
Operating System Upgrade Packages
Operating System Upgrade Packages are used for an in-place feature upgrade of Windows. e.g. Windows 10 20H2 -> Windows 10 21H2.
The content for an operating system upgrade uses a full copy of the original installation media.
Boot Images
The boot image is a WinPE environment used to run task sequences, primarily for OSD. WinPE has limited functionality but has several optional components enabled.
- Microsoft .NET (WinPE-NetFx)
- Network (WinPE-WDS-Tools)
- Scripting (WinPE-Scripting)
- Scripting (WinPE-WMI)
- Startup (WinPE-SecureStartup)
- Windows PowerShell (WinPE-PowerShell)
boot image to run PowerShell and add the Active Directory PowerShell module. See SCCM Boot Image Management for more info.
Task Sequences
NCSU-level OSD task sequences for bare metal/re-installs and in-place upgrades are available to use by all departmental IT staff. They are created and maintained by OIT’s Windows and Middleware Services (WMS) department.
The NCSU-level task sequences that are managed by WMS have their name prefixed with “NCSU-OS-” and are deployed to the All Unknown Computers device collection and the their respective NCSU-OS-* device collection, which we refer to as “Operating System Collections”. The NCSU-OS- device collections get their membership from groups in Active Directory Directory Services.
OSD using an NCSU-level task sequence is actually comprised of two task sequences.
- A parent task sequence that contains all the steps needed to get Windows installed on a computer.
- A child task sequence with one step that simply runs the parent task sequence.
More steps can be added to the child task sequence but, in general, isn’t necessary for NCSU-level OSD.
In the past, a template task sequence was created that departmental IT staff could copy the steps into their own task sequence for OSD. This method makes changes to, say for example, the PowerShell script that installs drivers, cumbersome because the change needs to be made to every task sequence that uses it. Splitting the OSD task sequences allows departmental IT staff to add steps to their own task sequence, installing applications for example, and not have to be concerned with the steps to install Windows.
Anatomy of NCSU-level OSD Task Sequences
Bare metal and reinstall
The same task sequence is used for bare metal installs and re-installs. Because of that there are a few steps that are necessary for re-installs but not bare metal installs.

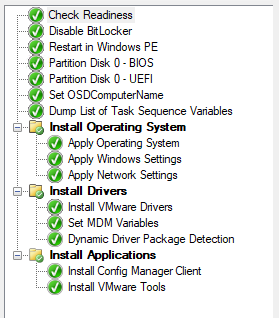
Check Readiness – In this step we set some checks that have to pass for the task sequence to run. Values for checks such as the minimum required RAM, CPU speed, free disk space, etc are taken from Microsoft’s system requirements for the build of Windows the task sequence installs.
Disable BitLocker – Needed for reinstalls. If a drive is BitLockered and it is not disabled before it reboots the Task Sequence will fail. If SCCM tries to disable BitLocker and BitLocker is not enabled the step will continue
Restart in Windows PE – If the task sequence is started from Software Center, the computer will reboot in WinPE image assigned to the task sequence. If a machine PXE boots, and the boot image is different from the version of WinPE assigned to the Task Sequence the machine will have to reboot into the correct WinPE image before starting the Task Sequence
Partition Disk 0 BIOS/UEFI – BIOS and UEFI machines have different disk layouts, and require different steps to detect how to format the disk. By default SCCM tries to format Disk 0, and it formats the entire disk. If you have multiple disk in a computer it is recommended to disconnect any data disk to avoid loss of data. If you have one disk that has been formatted with two partitions, one for the C: drive and a second for data, backup all data as SCCM will format the entire drive and any saved data will be lost. You can have a customized Task Sequence created that takes into consideration the presence of multiple drives or multiple partitions on a disk.
Set OSDComputerName – Custom script that uses the MAC address or UUID to search AD for a prestaged computer account, takes that name of that computer objects and sets it to the Task Sequence variable OSDComputerName. More information about the script can be found here.
Dump list of Task Sequence Variables – Runs the TSVarsSafeDump.ps1 script from the NCSU-OSD Production package. For troubleshooting purposes, this script writes all current task sequence variables to a log file called TSVariables-yyyy-MM-dd-HH-mm-ss.log.
Apply Operating System – Applies wim file from the selected operating system image to the primary storage device. Uses the NCSU-Unattend.xml file as an answer file.
Apply Windows Settings – Windows registration and licensing information, default time zone and language, and sets a randomized local administrator password. For a departmental task sequence, the local administrator password can be set to a known value that will get over written after Microsoft’s LAPS is installed.
Apply Network Settings – Sets the Active Directory domain to join and which account to use to do the join. Writes information needed to join the Wolftech domain to a file and the actual domain is done after the computer restarts, during Windows setup.
Install VMware Drivers – The only “traditional” SCCM driver package we use. Uses a WMI query to determine if the machine is an VMware VM and if so injects the VMware mouse, storage and network drivers into the operating system.
Set MDM Variables – Sets the task sequence environment variables, MDMUserName and MDMPassword, which are used by the Invoke-CMApplyDriverPackage.ps1 script to connect to the Config Manager Admin Service.
Dynamic Driver Package Detection – Runs the previously mentioned Invoke-CMApplyDriverPackage.ps1 script to determine the computer’s manufacturer, model and SystemSKU, connect to the Config Manager Admin Service and query for a matching driver package. If a package is found, its contents are downloaded and drivers installed using dism.exe.
Install Config Manager Client – Downloads and stages the Config Manager client. The install takes place after restarting into Windows once the task sequence has completed.
Install VMware Tools – Uses an Install Application step to install a version of VMware tools. This step only runs on VMWare hosts.
Upgrades
All upgrades are done in-place. User data and installed applications will be retained. Upgrade task sequences can only run from inside Windows. A deployment will either need to be Mandatory or made Available and started from the Software Center.

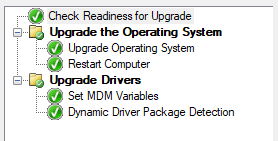
Check Readiness for Upgrade – Verifies the computer meets the minimum requirements to upgrade. A computer will need at least 32 GB of free space to download and install the upgrade.
Upgrade Operating System – Upgrade process takes place in the background. Users can continue to work.
Restart Computer – The reboot is required and the reboot cannot be suppressed or postponed.
Dynamic Driver Package Detection – Runs the previously mentioned Invoke-CMApplyDriverPackage.ps1 script to determine the computer’s manufacturer, model and SystemSKU, connect to the Config Manager Admin Service and query for a matching driver package. If a package is found, its contents are downloaded and drivers installed using dism.exe. Uses the previously mentioned modern driver management script to connect to SCCM web services and search for a driver package based on: operating system, architecture, make, and model. If a compatible driver package is found, it is downloaded and installed using either dism if done in WinPE or pnputil if in the full operating system.
If need be there can be checks and after action steps configured. Application, hardware, and driver compatibility can prevent a machine from upgrading. If there is a particular application that is preventing an upgrade from proceeding, a customized Upgrade Task Sequence can be created to uninstall the affected application before preforming the upgrade, then reinstall it afterwards.
How do I use an NCSU-level OSD task sequence in my departmental OSD task sequence?
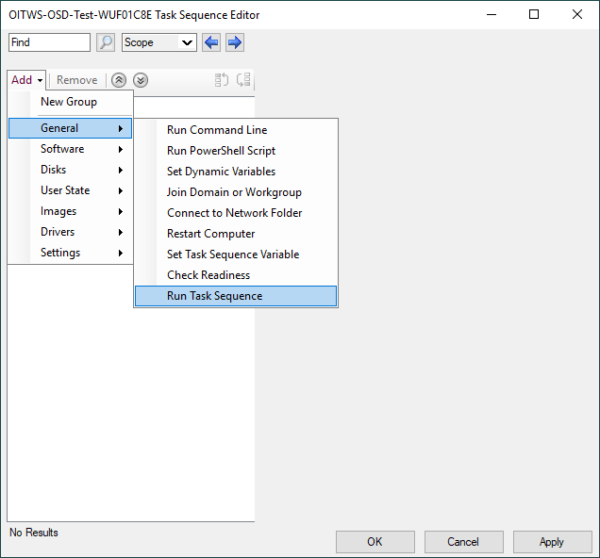
Add a Run Task Sequence step to your departmental task sequence.

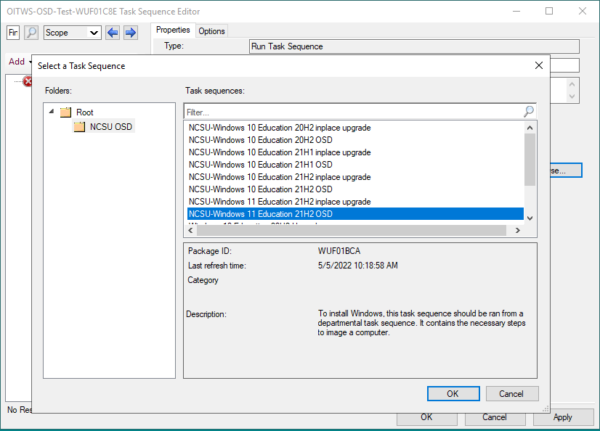
In the Run Task Sequence step, click the Browse… button.
Click on the NCSU OSD folder.
Click on one of the OSD task sequences.
Click the OK button.

Troubleshooting OSD
When doing a network install, the boot image downloads and WinPE loads but the computer restarts before the list of task sequences appears.
This occurs when the computer is a known device in Config Manager and the device is not a member of a device collection that has an OSD task sequence deployed to the collection.
To fix this you can either delete the device from Config Manager or make the computer a member of a collection that has an OSD task sequence deployed to it.
For the latter, add the computer object in Active Directory to one of your departmental OSD groups. e.g. <DEPT>-OS-Windows 10 Education-Base-21H2. Once the collection membership updates, you can try installing again.
The OSD task sequence appears to have completed successfully but when the computer restarts I can’t sign in with my domain account and it looks like the computer did not join the domain.
Windows tries to join the domain during Windows setup after the computer has restarted after the OSD task sequence has completed.
During OSD, if there was a problem installing the computer’s drivers, specifically the network driver, when running the Dynamic Driver Package Detection step, the computer’s network interface would not be up and connected during setup and Windows would not be able to talk to a domain controller to join the computer to the domain.
In this case we need to take a look at the Dynamic Driver Package Detection log file and check if the computer’s drivers are in Config Manager.
The Dynamic Driver Package Detection log file, ApplyDriverPackage.log, is located at C:\Windows\CCM\Logs\ if you’re in the full OS or C:\_smsTaskSequence\Logs\ if you’re in WinPE.
powershell
$cred = Get-Credential -UserName "wolftech\<you>.admin" #Prompts for a user name and password and stores the result as a System.Security.SecureString object
New-PSDrive -Name "N" -PSProvider FileSystem -Root "\\wolftech.ad.ncsu.edu\pathToSomewhereYouHaveAccessTo\" -Credential $cred
Copy-Item -Path C:\Windows\Logs\CCM\ApplyDriverPackage.log -Destination N:\
In Config Manager console go to Software Library -> Application Management -> Packages ->Driver Packages and click on one of the manufacturer folders. From there, search for the computer model and if there’s a result then the driver should be available.
There are a couple things that could still cause the driver step to fail. Namely the package doesn’t have the correct security scope set (should be NCSU-Read Only) and/or the content hasn’t been distributed.
A pre-staged computer object could not be found.
Our imaging procedure works best when a computer object is pre-staged in an appropriate OU in Active Directory with its netbootGUID attribute set to twenty zeros + the network interface’s MAC address or the computer’s UUID in the proper format.
When booted to a WinPE environment the computer name is MININT-<7 random letters and numbers>. MININT stands for Minimum Windows NT for the trivia buffs out there.
Verify the computer was prestaged in AD using the correct MAC address, if you are using the UUID make sure the UUID was added in the proper format. All non-prestaged computers are joined to the domain in the Unassigned OU, only OU Admins have permissions to login to those machines. Login to the machine and check C:\Windows\CCM\Logs\TSVariables-yyyy-MM-dd-HH-mm-ss.log, there should be a variable called OSDComputerName, check the value. You can rename the computer object and move it to the correct OU. You can start over by moving the misnamed computer object to your OU, wait for SCCM to update, and delete the computer object.
We have implemented a new script that checks for pre-staged computer objects and warns users when one cannot be found. This should greatly reduced the number such incidents from happening.
A step in the task sequence fails.
There are many reasons a step in a task sequence could fail and the easiest way to troubleshoot is by examining the smsts.log file. The smsts.log records task sequence activities so if there’s a failure, it’s the place to start looking.
If this happens to you, the quickest way to get the problem resolved is to get a copy of smsts.log . We may ask for additional log files after taking a look in order to be able to further troubleshoot the problem.
So, how do we get the log file? When a task sequence is running, the log files are stored at:
C:\_smsTaskSequence\Logs\
Easy to get if you’re in a full OS. Not so straightforward if you’re in WinPE. But that’s okay, we got this.
In WinPE, press the F8 key to open a command prompt and run the following commands.
powershell
$cred = New-Credential #Prompts for a user name and password and stores the result as a System.Security.SecureString object
New-PSDrive -Name "N" -PSProvider FileSystem -Root "\\wolftech.ad.ncsu.edu\pathToSomewhereYouHaveAccessTo\" -Credential $cred
Copy-Item -Path C:\_SMSTaskSequence\Logs\smsts.log -Destination N:\
Grab the log file from the destination and attach it to an existing ServiceNow incident or email it to activedirectory_imaging@help.ncsu.edu to open a new incident.